


Calibrating 3D Resin Exposure
At 3DRS, we are passionate about resin printing. We developed the 3DRS Starship Calibration test and the 3DRS Chip Test as a fun way to dial in your resin settings on any given printer. The Chip is smaller and should print in under 30 minutes on Mono printers, the Starship is slightly larger, includes more geometrical stress tests, and has more table-top appeal. Below are 5 of the main tests that we consider the most important for beginners or seasoned vets alike. We may expand on our Starship to include more tests in the future.
Both the Ship and Chip include the 5 main tests listed below. The Chip includes only a single row of hammer tests, where the Starship includes two rows with different diameters.
Downloads:
Download the 3DRS Starship V1.3 .stl HERE
Download the 3DRS Chip V1.2 .stl HERE
Download the 3DRS Chip V2.0 .stl HERE - New Tests (Scroll to the bottom)

Test #1: The Pillars: Two sets of pillars on each wing at 45* angles ( .1mm – .9mm ) in thickness. We consider test #1 and test #2 to be critical tests for determining the print-ability of your settings / resin combo. Generally, the more rigid the material is, the more rows you will be able to print without overexposing. The pillars can help you determine the strength of the material, as well as the required size of your support structure for the resin you are using. We like to see at least 7-8 of these rows printed and maintaining form after post processing. ( .9 -.3mm pillars at minimum ).

Test #2: Hammer Stress Test: This test helps determine if the resin settings are adequate to develop the resins tensile strength and layer adhesion. The blocks on top are twice the diameter of the pillars that support them. (.5mm and 1mm in the first row_ .7mm and 1.4mm in the second row). Underexposing your print will result in failed or deformed hammers due to the increase pull force from the FEP combined with under- polymerized resin. We recommend adjusting your resin settings to the lowest possible exposure that allows all 11 hammers to print.

Test #3: Basic Exposure Test: The basic 3D exposure test consists of 7 rectangular cuts into the base of the model. (1mm, .8mm, .6mm, .4mm, .4mm, .2mm, .1mm). Ideally, all these rectangles are clearly defined and open with sharp edges. Overexposing the print will result in some or all these openings being rounded, closed, or nonexistent. This test can be difficult when printing Clears without U.V blockers or pigments. Increasing pigment load (U.V Blockers) can aid in well defined, sharp prints. If your .4mm and/or .2mm rectangles are closed, consider reducing your exposure to increase the detail of your resin prints. (Do not reduce to the extent that Test #2 becomes a fail).
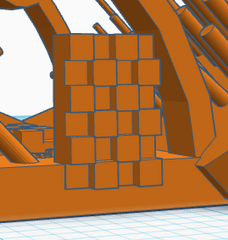
Test #4: Checkerboard: The Checkerboard pattern with .5mm depth is a great way to test definition and print quality. Not unlike the exposure test, the checkerboard should be sharp and well defined. Overexposure will result in deformation. Resin that is not properly mixed may show inconsistencies in the pattern (some sections print well, while others are deformed).
Test #5: Logo Test: Each character in the logo is set at a different angle. (3=23°, D=37.5°, R=45°, S=53°) – This test allows you to identify the proper angle for your application (layer height / exposure settings) to reduce layer lines for smooth flat surfaces. Once printed, carefully angle the print to reflect the light and reveal the layer lines. At .05 layer thickness, you should be able to identify layer lines on the D and the S. Changing your layer thickness will result in different characters within the logo having smoother finishes than others.

Test #6: Stardrive: (Not on the Chip test) In addition to being a solid geometrical stress test for the material, my 7-year-old daughter named the print and wanted to put a star there. That is all.
The 3DRS Starship contains a number of features that test resin capabilities including raised writing, varying hole diameters, and interesting geometry. We hope this information is helpful on your 3D printing adventure.
2024 Updates to the 3DRS Chip Test V 2.0
Test #7: Support Density:

Explore how different size pillars with varying support density effect the printability of the hammers.

Test #8: Dimensional Accuracy: "Boxes of Calibration by J3Dtech"
This test allows you to test the dimensional accuracy of your resin / settings combination. Break away both the male (4mm section) and female (6mm section) - The male square should fit smoothly into female section without resistance. We did not design this test, it was given to us from a customer. Check out J3DTech's youtube channel HERE
 Test #9: The MCD (Minimum Contact Diameter): Use this test to get an idea of the contact diameter recommended for the supports / resin combination. Each pillar (.2 to 1mm) holds a sphere that is twice its diameter. A rigid resin that is slightly over cured will likely be able to hold an MCD of .2mm without warping, while a flex resin may need an MCD of .4 or .5 mm.